
Migrate from Kamal to Temps
Kamal has no server-side API — its "state" is the config/deploy.yml file plus the containers it started with it. Temps' import wizard parses that file directly and recreates the service it describes as a real Temps project — a pulled image, environment variables, and a live deployment included.
Why this one's different
Every other supported platform has an API Temps queries live. Kamal doesn't — it's a CLI tool that runs from your machine and drives containers over SSH. There's nothing to "discover" from a running Kamal deployment beyond the config file that describes it, so the import reads config/deploy.yml instead of connecting to anything. A real kamal deploy doesn't need to have succeeded for the import to work — the file is enough.
What Temps discovers from deploy.yml
- The service name and image
- Declared accessories (e.g. a Postgres or Redis container)
- Environment variables under
env.clear
Before you start
Two things to resolve before pasting the file in:
- Secret values don't transfer. Variables listed under
env.secretindeploy.ymlare names only — their actual values live in.kamal/secrets(or your secrets manager), which the file never contains. They import as empty placeholders; fill in the real values in the Temps project after the import. - Resolve ERB templating first. If
deploy.ymluses ERB (<%= %>) for interpolated values, runkamal configand paste its rendered output instead of the raw template — Temps parses YAML, not ERB.
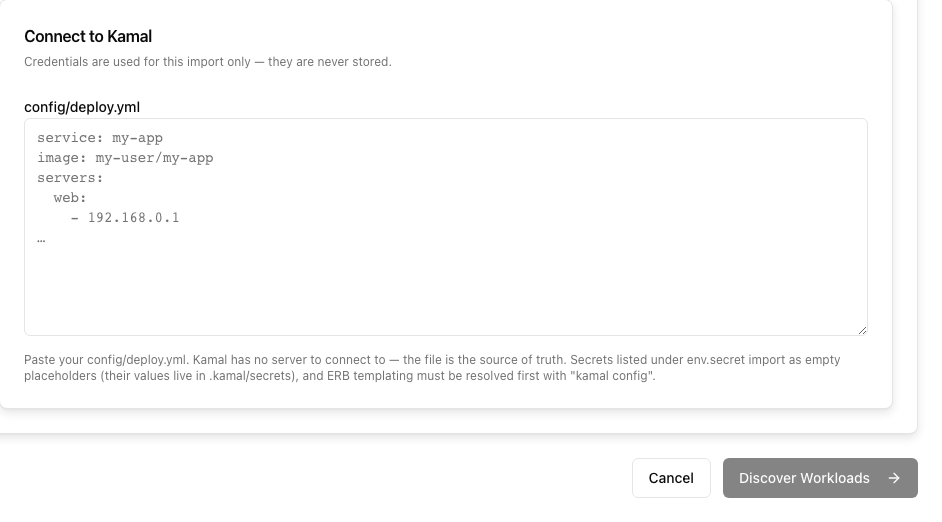
Step 1: Discover
Discover the service described in deploy.yml
- 1
In the Temps dashboard, go to Projects, then click Import.
- 2
Select Kamal as the source.
- 3
Paste the contents of config/deploy.yml (run kamal config first if it uses ERB).
- 4
Click Discover Workloads.
Step 2: Review the plan
Temps shows the plan it will execute: the project name, the image it will pull, the environment variables it found under env.clear (secret variables show as empty placeholders you'll fill in after import), and any accessory it will create as a managed service. Since there's no git repository to link, the plan shows the project as image-based (Type: docker) and the repository-linking step is skipped entirely.
Step 3: Execute the import
Run the import end to end
- 1
Review the plan and click Execute Import.
- 2
Fill in the real values for any secret environment variable before the deployment needs them.
- 3
Temps creates the project and its services, pulls the discovered image, and starts the container.
- 4
Wait for the deployment to reach a healthy state — Temps verifies the app actually answers before reporting the import complete.
Your Kamal deployment keeps running the whole time — the import only reads the config file. Verify the imported app on its Temps-provided address before touching DNS.
After the import
Once you've confirmed the imported app behaves correctly, add your production domain and cut DNS over — see moving the production domain. Keep the Kamal deployment running until you've verified normal traffic on Temps.
For the general import flow that applies across every supported platform, see Import an Existing Platform.