
Migrate from Kubernetes to Temps
Temps connects to your cluster with a kubeconfig, discovers Deployments, StatefulSets, and CronJobs, and recreates one as a real Temps project — a pulled image, environment variables, and a live deployment included.
When this makes sense
Kubernetes earns its overhead at fleet scale. A handful of small, simple services running on a full cluster — control plane, etcd, scheduler, all the YAML that comes with it — is a lot of operational surface for workloads that don't need it. If that's your cluster, importing those workloads into Temps trades the cluster's operational overhead for a single binary and a wizard-driven redeploy.
What Temps discovers from a cluster
- Deployments and StatefulSets, with their container image, resource requests/limits, and ports
- CronJobs
- Environment variables from the pod spec, ConfigMaps, and Secrets
- Services in the same namespace, so it can flag other workloads the one you're importing depends on
The imported project deploys straight from the discovered container image — there's no build step.
Before you start
You need a kubeconfig with either an embedded bearer token or a client certificate.
exec-based authentication (the AWS EKS and Google GKE credential plugins) is not supported — the plugin binary Temps would need to invoke doesn't exist on the Temps server. Mint a ServiceAccount token instead and build a kubeconfig around it.
Temps needs to read Secret values (to discover the environment variables they inject), so the built-in view ClusterRole isn't enough — it deliberately excludes reading Secret contents. Grant a scoped custom role instead:
apiVersion: rbac.authorization.k8s.io/v1
kind: Role
metadata:
  name: temps-import
  namespace: your-namespace
rules:
  - apiGroups: ["", "apps", "batch", "autoscaling"]
    resources: ["pods", "services", "configmaps", "secrets", "deployments", "statefulsets", "cronjobs", "horizontalpodautoscalers"]
    verbs: ["get", "list"]
kubectl apply -f temps-import-role.yaml -n your-namespace
kubectl create serviceaccount temps-import -n your-namespace
kubectl create rolebinding temps-import --role=temps-import --serviceaccount=your-namespace:temps-import -n your-namespace
kubectl create token temps-import -n your-namespace --duration=24h
Embed the resulting token in a kubeconfig alongside your cluster's server URL and certificate-authority-data.
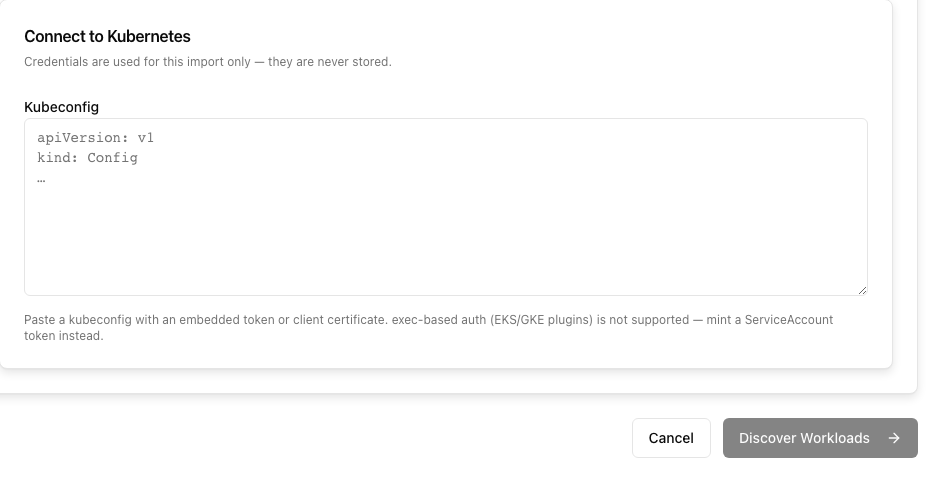
Step 1: Connect and discover
Discover what's running in the cluster
- 1
In the Temps dashboard, go to Projects, then click Import.
- 2
Select Kubernetes as the source.
- 3
Paste the kubeconfig YAML into the credentials textarea.
- 4
Click Discover Workloads.
Temps queries the Kubernetes API server directly — nothing is created on this step.
Step 2: Review the plan
Pick the workload to import and Temps shows the plan it will execute: the project name, the image it will pull, resource requests translated into Temps limits, every environment variable it found (secrets masked), and any database it detects as a dependency. Since there's no git repository to link, the plan shows the project as image-based (Type: docker) and the repository-linking step is skipped entirely.
If the workload depends on a database running in the same cluster, that database usually isn't reachable from outside the cluster network — the plan says so explicitly and gives you the pg_dump / psql commands to move the data by hand instead of silently skipping it.
Step 3: Execute the import
Run the import end to end
- 1
Review the plan and click Execute Import.
- 2
Temps creates the project and its services, pulls the discovered image, and starts the container.
- 3
Wait for the deployment to reach a healthy state — Temps verifies the app actually answers before reporting the import complete.
Your cluster keeps running the whole time — the import only reads from it. Verify the imported app on its Temps-provided address before touching DNS or scaling down the original workload.
After the import
Once you've confirmed the imported app behaves correctly, add your production domain and cut DNS over — see moving the production domain. Keep the original Deployment or StatefulSet running (scaled down if you want to save resources) until you've verified normal traffic on Temps.
For the general import flow that applies across every supported platform, see Import an Existing Platform.