
Migrate from Portainer to Temps
Temps connects directly to your Portainer instance, discovers the containers and Compose stacks running on it, and recreates them as real Temps projects — a pulled image, environment variables, and a live deployment included.
What Temps discovers from Portainer
- Standalone containers and Compose stacks
- The container's environment variables (read from Portainer's container inspect API)
- Databases running as containers in the stack
Portainer workloads are containers, not git repositories, so the imported project deploys straight from the discovered image — there's no build step. For a database Temps can reach from the machine running the import, its data copies into a Temps-managed service automatically.
Before you start
Portainer doesn't issue per-user API tokens for this — Temps authenticates with the Portainer admin password (a non-admin username can be supplied instead; the default is admin).
You'll also need your Portainer instance's URL (e.g. https://your-portainer-host:9443).
Portainer ships a self-signed TLS certificate by default. If discovery fails against your instance's :9443 port, check Skip TLS certificate verification in the credentials step — it's only ever sent when you explicitly enable it.
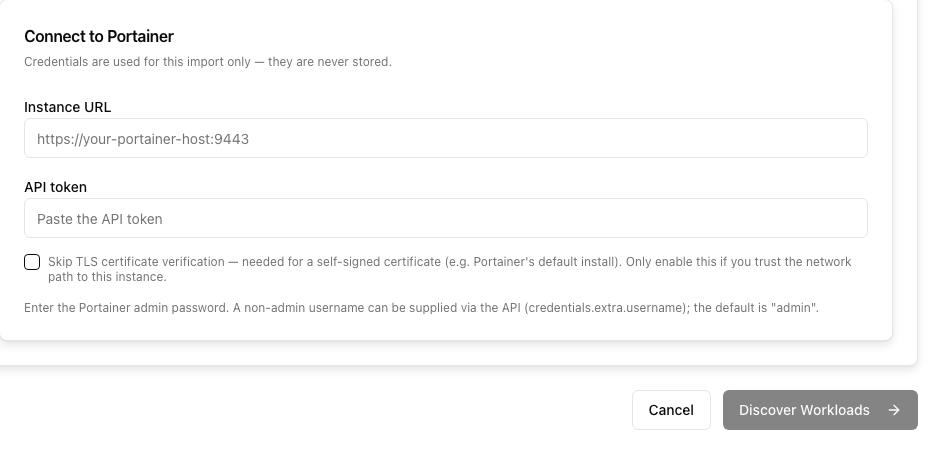
Step 1: Connect and discover
Discover what's running on Portainer
- 1
In the Temps dashboard, go to Projects, then click Import.
- 2
Select Portainer as the source.
- 3
Enter the instance URL and the admin password. If your instance uses the default self-signed certificate, check Skip TLS certificate verification.
- 4
Click Discover Workloads.
Temps queries the Portainer API directly — nothing is created on this step.
Step 2: Review the plan
Pick the container or stack to import and Temps shows the plan it will execute: the project name, the image it will pull, every environment variable it found (secrets masked), any databases it will create as managed services, and the domains it discovered. Since there's no git repository to link, the plan shows the project as image-based (Type: docker) and the repository-linking step is skipped entirely.
Step 3: Execute the import
Run the import end to end
- 1
Review the plan and click Execute Import.
- 2
Temps creates the project and its services, pulls the discovered image, and starts the container.
- 3
Wait for the deployment to reach a healthy state — Temps verifies the app actually answers before reporting the import complete.
Your Portainer instance keeps running the whole time — the import only reads from it. Verify the imported app on its Temps-provided address before touching DNS.
After the import
Once you've confirmed the imported app behaves correctly, add your production domain and cut DNS over — see moving the production domain. Keep the Portainer deployment running until you've verified normal traffic on Temps.
For the general import flow that applies across every supported platform, see Import an Existing Platform.